just chil

Tuesday, March 17, 2015

HOW TO CONFIGURE OUTLOOK EXPRESS FOR YAHOO AND GMAIL

CONFIGURE OUTLOOK EXPRESS FOR YAHOO ACCOUNT

o you want to read and send your Yahoo! email with Outlook Express? If you are a Yahoo! Mail Plus user you can. Here’s how to set up Outlook Express to read and send Yahoo! Mail Plus: 
  1. From the Tools menu, select Accounts.

    Internet Accounts Mail tab
  2. Select the Mail tab. Click Add > Mail. This starts the Internet Connection Wizard.

    Internet Connection Wizard Name
  3. In the Internet Connection Wizard, type your name as want it to appear when you send an email message, and then click Next.

    Internet Connection Wizard Email
  4. In the E-Mail address box, type your Yahoo! Mail Plus email address (for example, testing80@yahoo.com), and then click Next.

    Internet Connection Wizard Server
  5. In the E-Mail Server Names fields:
    • My Incoming mail server is a: Select POP3 from the pull-down menu.
    • Incoming mail (POP3, IMAP, or HTTP) server: Typeplus.pop.mail.yahoo.com.
    • Outgoing mail (SMTP) server:[/b] Type plus.smtp.mail.yahoo.com.

    Click Next.

    Internet Connection Wizard Logon
  6. In the Internet Mail Logon fields:
    • Account Name: Type your Yahoo! ID (your email address without the "@yahoo.com").
    • Password: Type your Yahoo! password.
    • Select the Remember Password checkbox if you don't want Outlook Express to prompt you for your password each time you check your mail.
    • Do not select the Log on using Secure checkbox.
    Click Next. A screen appears telling you that you have successfully entered the information needed to set up your account.
  7. Click Finish to save your account and exit the wizard.

    Internet Account properties
  8. The Yahoo! Mail outgoing mail server requires authentication. To turn this on, underAccount, select plus.pop.mail.yahoo.com and then click Properties. A properties dialog box for the account appears.

    Internet Account properties Servers tab
  9. Click the Servers tab. Under Outgoing Mail Server, select the My server requires authentication checkbox.
  10. Click the Advanced tab.

    Internet Account properties SMTP settings

    • Under Outgoing Mail Server (SMTP), select the This server requires a secure connection (SSL) checkbox.
    • In the Outgoing mail (SMTP) field, type 465 for the port number.
    • Under Incoming mail (POP3), select the This server requires a secure connection (SSL) checkbox. The port number in the Incoming mail (POP3) field usually changes automatically from 110 to 995. If it doesn’t, type 995 for the port number.
  11. Click OK to save your settings.
  12. Click Close to close the Internet Accounts dialog box.
You are now set up to send and receive Yahoo! Mail using Outlook Express.
Troubleshooting tips
If you still can’t send Yahoo! Mail from Outlook Express, you might be accessing the Internet through an ISP that is blocking the SMTP port. If this is the case, try using port 587 when sending email via Yahoo!'s SMTP server. To change the port to 587:
  1. From the Tools menu, select Accounts. The Internet Accounts dialog box appears.

    Internet Account properties
  2. Click Mail, select plus.pop.mail.yahoo.com, and then click Properties.

    Internet Account properties port numbers
  3. Click the Advanced tab. In the Outgoing mail (SMTP) box, type 587.
  4. Click Apply, and then click OK to close the Internet E-mail Settings dialog box.
  5. Click Close to close the Account Settings dialog box.

CONFIGURE OUTLOOK EXPRESS FOR GMAIL ACCOUNT


1  Enable pop in Gmail. 

Enabling POP You can retrieve your Gmail messages with a client or device that supports POP, like Microsoft Outlook or Netscape Mail.
To enable POP in Gmail:
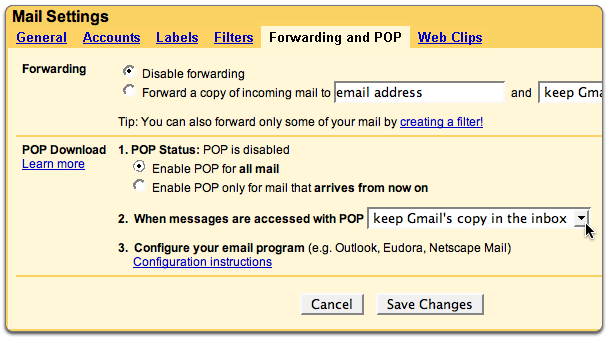
  • Sign in to Gmail.

  • Click Settings at the top of any Gmail page.

  • Click Forwarding and POP/IMAP .


  • Gmail POP Settings
  • Select Enable POP for all mail or Enable POP for mail that arrives from now on .

  •  Save Changes .


  • 2 .configure  Outlook Express  to work with Gmail: 
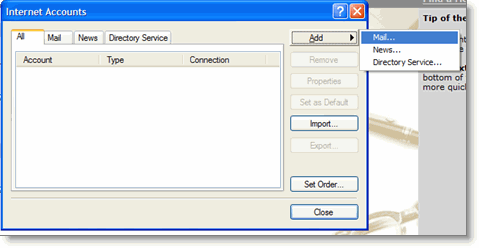
  • Open Outlook or Outlook Express.

  • Click the Tools menu, and select Accounts...

  • Click Add , and then click Mail...

  • Add 
mail account
  • Enter your name in the Display name: field, and click Next .

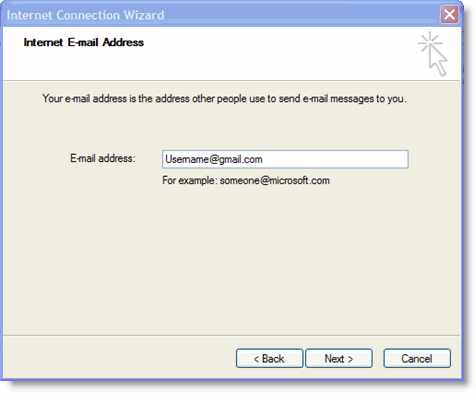
  • Enter your full Gmail email address (username@gmail.com) in the Email address: field, and click Next . Google Apps users, enter your full address in the format 'username@your_domain.co m.'

  • Enter username
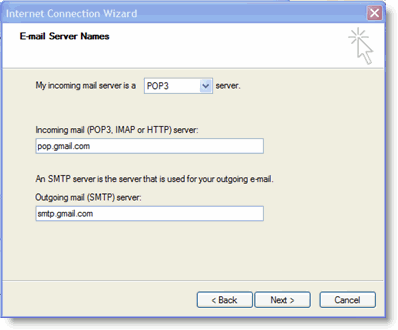
  • Enter pop.gmail.com in the Incoming mail (POP3, IMAP or HTTP) server: field. Enter smtp.gmail.com in the Outgoing mail (SMTP) server: field. Google Apps users, enter the server names provided; don't add your domain name in this step.

  • Enter server names
  • Click Next .

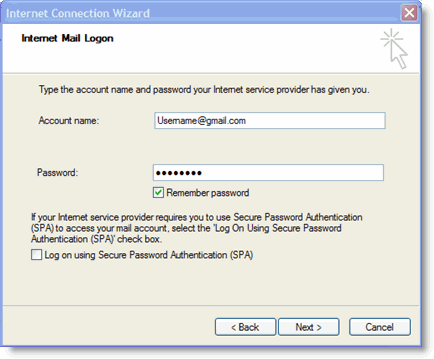
  • Enter your full email address (including '@gmail.com' or '@your_domain.com') in theAccount name: field. Enter your email password in the Password: field, and click Next .

  • Enter account name and password
  • Click Finish .

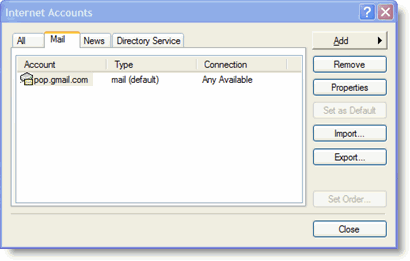
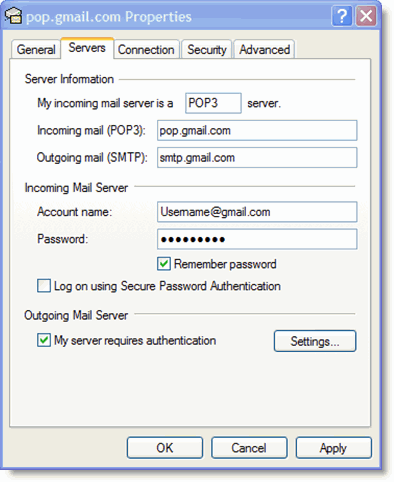
  • Highlight pop.gmail.com under Account , and click Properties .

  • Highlight account
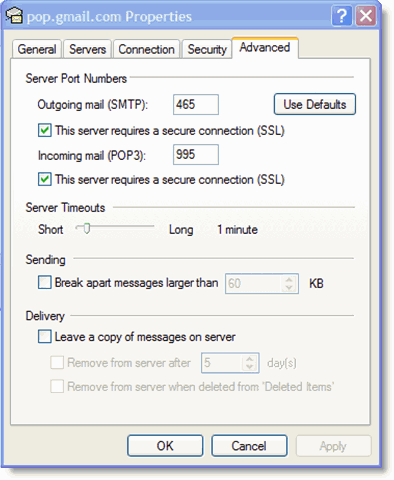
  • Click the Advanced tab.

  • Fill in the following information:*
    • Check the box next to This server requires a secure connection (SSL) underOutgoing Mail (SMTP) .
    • Enter 465 in the Outgoing mail (SMTP): field.
    • Under Outgoing Mail (SMTP) , check the box next to This server requires a secure connection (SSL) .
    • Under Incoming mail (POP3) , check the box next to This server requires a secure connection (SSL) . The port will change to 995 .
    • Highlight account
    *The order of Outgoing and Incoming mail server fields varies by version. Make sure you enter the correct information in each field.

  • Return to the Servers tab, and check the box next to My server requires authentication .

  • Highlight account
  • Click OK .
  • Thursday, March 12, 2015

    YUMI – Multiboot USB Creator

    It can be used to create a Multiboot USB Flash Drive containing multiple operating systems, antivirus utilities, disc cloning, diagnostic tools, and more in a single USb flash drive.

    Source and download Link:-
     http://www.pendrivelinux.com/yumi-multiboot-usb-creator/

    All files and folders disappear and convert in to a shortcut in USB Flash drive

    This is a problem with your file structure, your USB stick was probably hit by a virus.

    "There Was A Problem Starting -SWDL.USDrv.

    Error loading_WWWYUMKZKKD.init and under it saying ` The specified module  could not be found.
    RUN.DLL error occurs

    Solution :-

    go to the command prompt and type


    attrib -h -r -s F:*.* /s /d 


    Replace F with your drive letter (USB drive)


    now check all folders are back to normal, now you can delete the shortcut.


    You need permission to perform this action error message, deleteing files or folder in window 7

    If you are facing problem to delete files or folder in window 7 with error message "You need permission to perform this action "  then Please follow the below steps......


    Change the Owner:

    1. Right-click the file or folder for which you want to set permissions, click Properties , and then click the Security tab.
    2. Click Advanced to open the Advanced Security Settings for  dialog box.
    3. Click Owner tab, click Edit. If you are prompted for an administrator password or confirmation, type your password or click Continue.
    4. In the new Advanced Security Settings for  box, in the Change owner to:field, select your User name, and Check the Replace owner on subcontainers and objects. Click OK, repeat for remaining boxes. (If your User name is not listed click theOther users or groups button to add your account).
    5. Open the directory containing the folder you wish to delete. Right-click the folder and delete it or make changes to it.

    Take Ownership:

    Another step to consider if the above steps failed is adding take ownership to the right click context menu.
    1. Download the TakeOwnership.zip file from here.
    2. Extract the RAR file to the Desktop or any folder to get a file named “Ownership.reg”. Note that if you want to see the extension “.reg” you need to enable it in “Folder Options” but it’s not necessary.
    3. Right-click on Ownership.reg file and select Merge option.
    4. Click “Yes” for the User Account Prompt (UAC) and then again click “Yes” for the Registry Editor pop up and then click “OK” when you get the successful message.
    5. Now, you will see a new option named Take Ownership when you right-click on a file or folder.
    6. Right-click on folder/file for which you want to take ownership and select TakeOwnership option to take ownership of the file or folder.


    source :-  http://www.avoiderrors.net/solved-you-need-permission-to-perform-this-action-windows-7/